Rev360 NRS Portal: Login, Registration & Filing Guide
The Nigeria Revenue Service (NRS) has officially transitioned from TaxPro Max to Rev360.
This is not just a UI update; it is a “Tax 3.0” automation department project (Version 1.0) designed for a unified national data framework.
It integrates directly with the CAC and NIMC to ensure every taxpayer’s data is verified in real-time.
How to Login to Rev360: Step-by-Step Guide
The Rev360 platform uses a unified authentication process called the NRS Single Sign-On (SSO). This means your login is more secure and connected to all other NRS services.
Step 1: Access the Official Portal
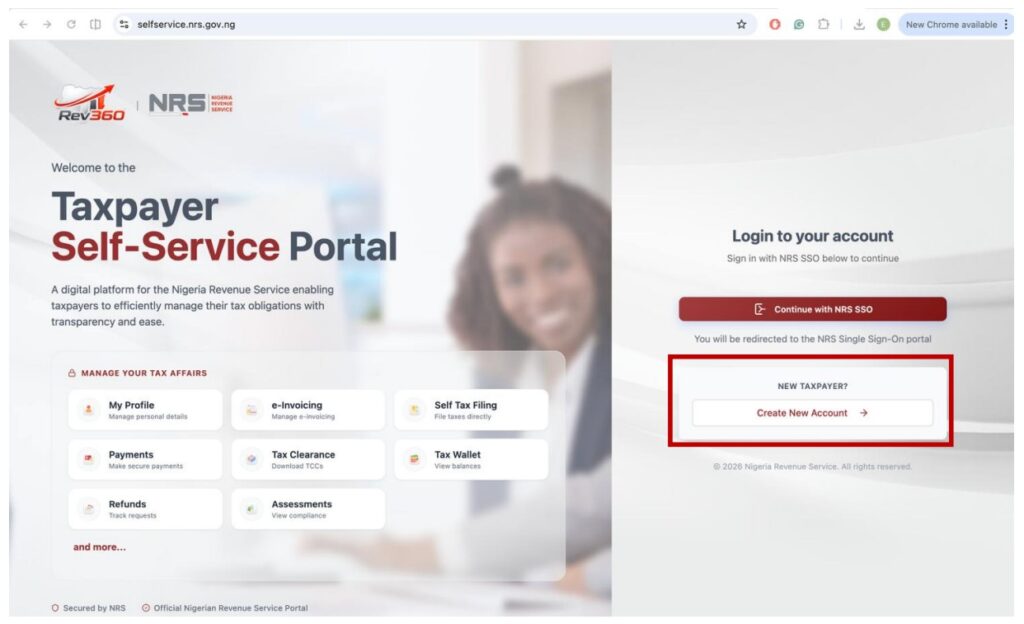
Go to the official self-service URL: selfservice.nrs.gov.ng.
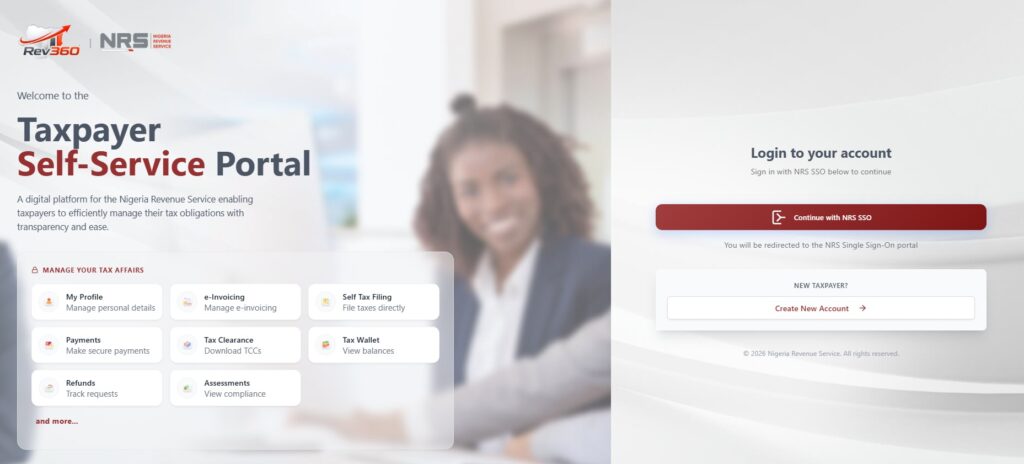
Step 2: Initiate the SSO
On the homepage, do not look for a standard username box immediately. Instead, click the button that says “Continue with NRS SSO.” This is the “gate” to the secure portal.
Step 3: Enter Your Migration Credentials
Username: Check your registered email address.
Password: Enter the temporary password sent to your email during onboarding or migration from TaxPro Max.
Note: Your username and password are sent to your registered email address during onboarding or
migration.
Step 4: The First-Time Access Rule
If this is your first time logging in since the migration, the system will immediately prompt you to change your password.
Tip: Choose a strong password with at least one capital letter, one number, and one special character (like @ or #) to ensure the system accepts it.
Transitioning from TaxPro Max: What Happens to My Account?
If you have an existing account on TaxPro Max, do not attempt to create a new one.
Automatic Onboarding: Your data is already moved. You must wait for an email from NRS containing your new login credentials and a fresh Registration Certificate. These will be sent directly to your registered TaxPro Max email address.
First-Login Rule: You will be need to change your temporary password immediately upon your first successful sign-in at selfservice.nrs.gov.ng.
New Corporate Registration (CAC Process)
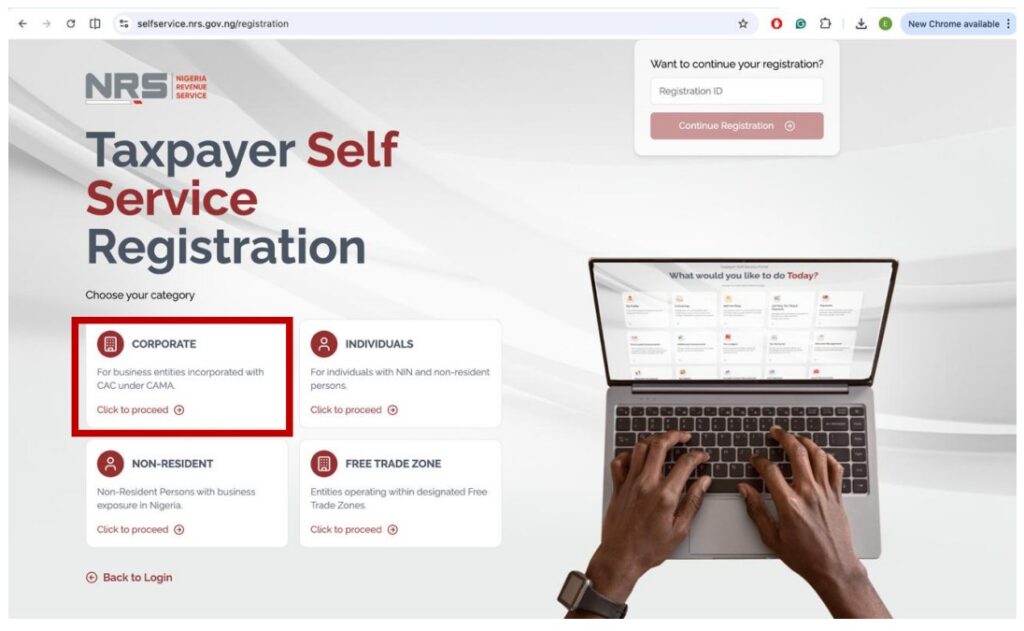
For companies not previously on TaxPro Max, the registration is now a 13-step digital process:
1. Access: Visit selfservice.nrs.gov.ng and click “Create New Account.”
2. CAC Verification: Select Corporate as the category, select the category that applies to the business you want to register, and enter your RC Number. The system pings the CAC database to pull your company details.

3. OTP Security: Click Proceed to OTP Verification. An OTP is sent to the email/phone registered with CAC. You must enter this to prove ownership.
4. Business Details: Enter your business contact details, commencement date, accounting year-end, and business sector. You can also add branch information if applicable.
5. Tax Office Selection: Select your preferred Tax Office. It is recommended to choose the office closest to your business location. Also, note that the Add Tax Representative is Optional, but if you choose yes, you will need to enter your Tax Representative’s Tax ID.
6. Resume ID: If you are interrupted, the system generates a Resume ID. You can use this to continue your application later without starting over.
7. MNE & CFC Declarations: You must indicate if you are a constituent of a Multinational Enterprise (MNE) or have a Controlled Foreign Company (CFC). If you choose Yes for Multinational Enterprise (MNE), select Add Entity for every entity and fill in the required details (Entity Name, TaxID, Country of Residence, Percentage Holding). Also, if you choose Yes for Controlled Foreign Company (CFC), click on Add Company for every CFC and fill in the required details (Entity Name, TaxID, Country of Residence, Percentage Holding).
8. Document Uploads: You must provide a clear PDF scan of a Director’s ID (National ID, Passport, or Driver’s License) and a Utility Bill.
Profile & Account Management
Rev360 allows for more autonomy in managing your tax identity:
Tax Office Transfer: You can now request a transfer to a different tax office via “My Profile.” You must select the new State and Office and provide a formal reason for the move.
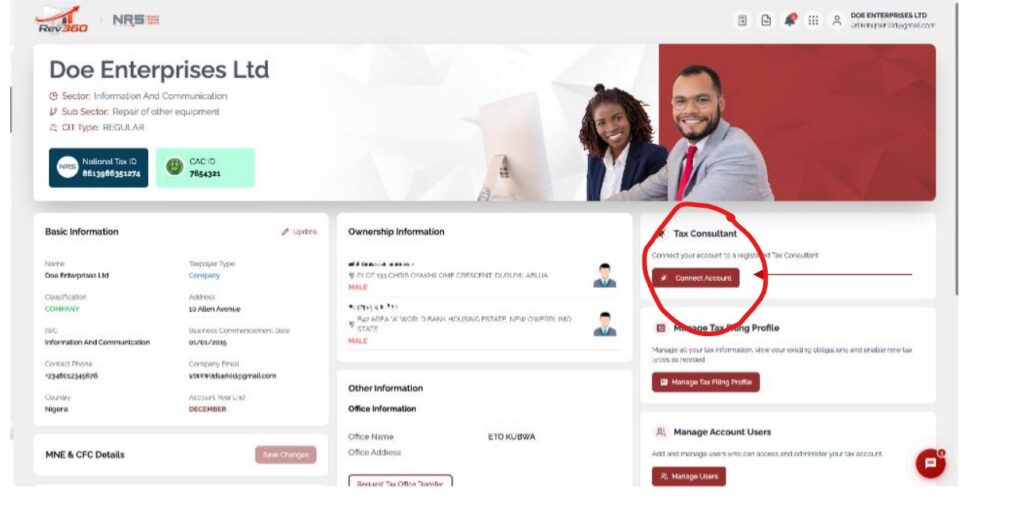
Connect Tax Consultant: You can link your account to a registered consultant by entering their Tax ID. This authorizes them to file on your behalf.
Step-by-Step Guide: Filing Company Income Tax (CIT)
Filing CIT on Rev360 follows a strict sequence. If you miss a step in the Excel template, the portal will reject your upload.
Step 1: Initiation
1. Log in and navigate to “Self Tax Filing” -> “Taxes Due.”
2. Select the earliest CIT form and click “File Now.”
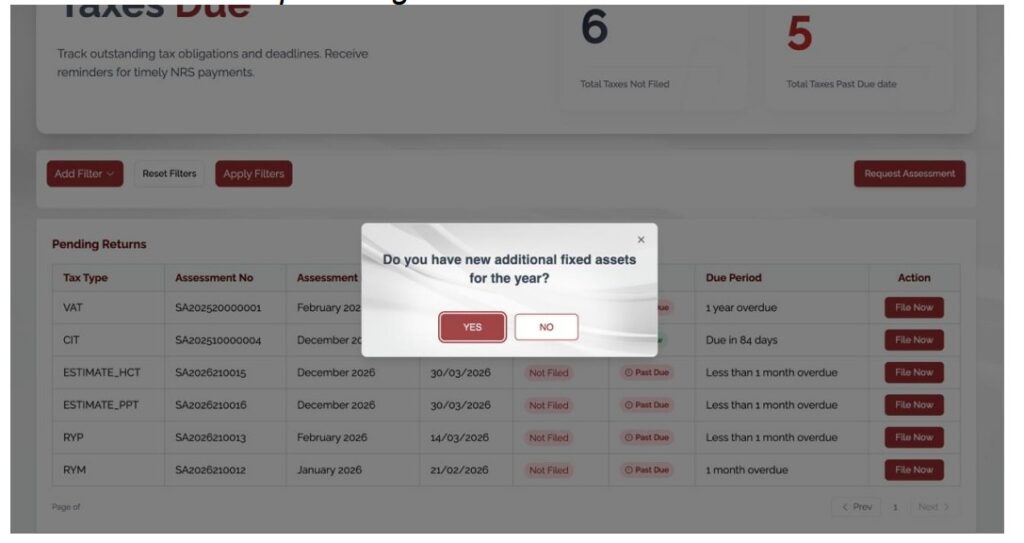
Step 2: The Mandatory Asset & MNE Prompts
Before the form opens, you must clear three “gatekeeper” prompts:
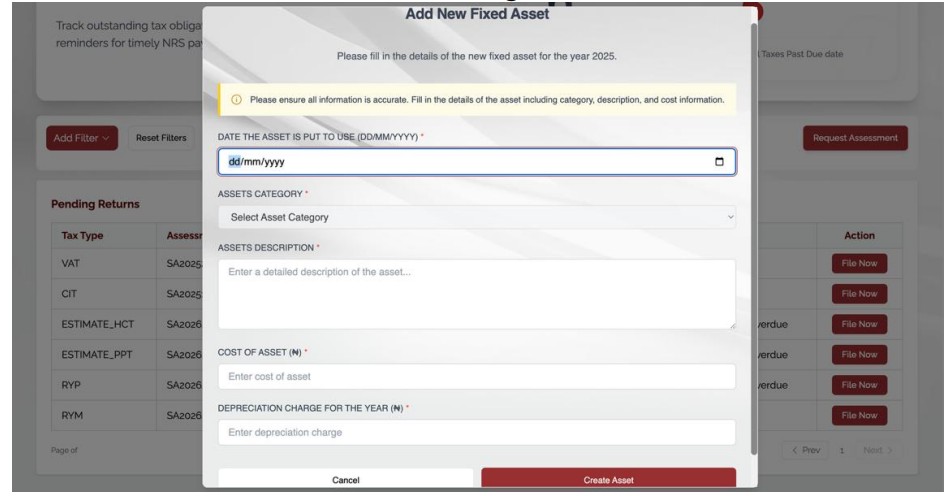
1. Fixed Assets: The system asks: “Do you have new fixed assets?” You must either create new ones (Date, Category, Cost) or update the depreciation for existing ones.
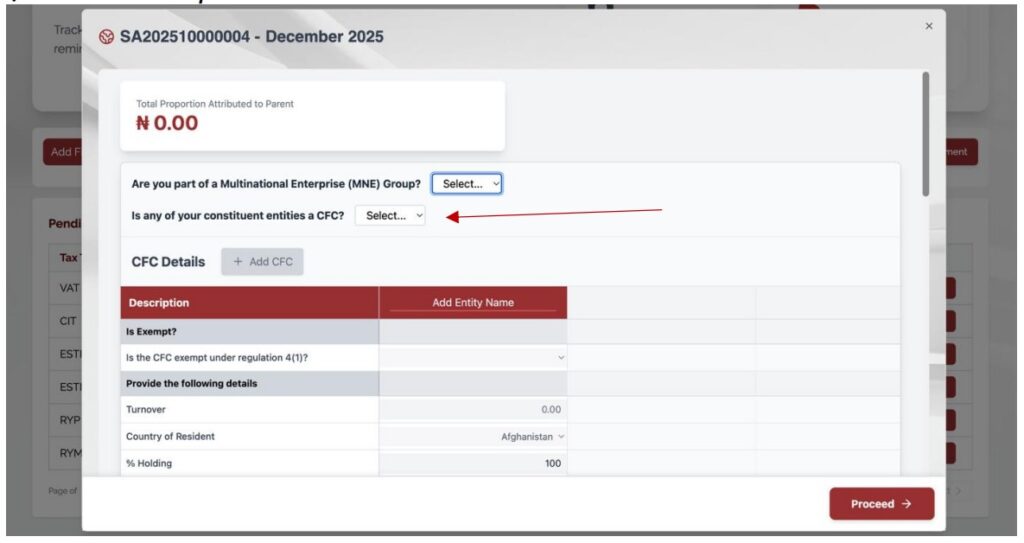
2. MNE Disclosure: Indicate if you are a member of a Multinational Enterprise. If yes, you must enter the Group Turnover in Euros.

3. CFC Disclosure: Indicate if you have a Controlled Foreign Company.
Step 3: The Excel Template Workflow
1. Download the Income Tax Excel Template from the link provided on the portal. The template is designed for offline completion. Also, ensure all fields are properly filled before upload, and do not alter formulas embedded in the template.
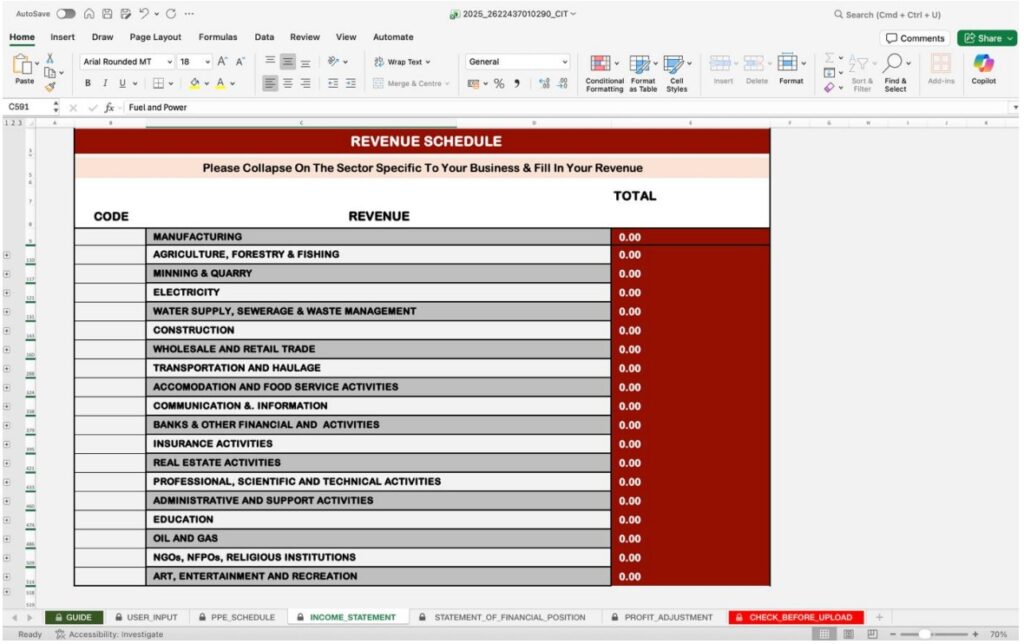
2. Income Statement Sheet: Use the “+” icon to expand revenue lines. Warning: If you have non-taxable income, you must manually isolate and report the related expenses in the specific “Non-Taxable Income Adjustment” section.
3. Statement of Financial Position: Ensure Total Assets = Total Equity + Total Liabilities. If it doesn’t balance, the template will not hit 100%.
4. Profit Adjustments: Use this sheet to “Add-Back” non-allowable expenses (like fines or penalties).
Step 4: The 100% Rule & Upload
1. Check the Progress Bar at the top of the Excel sheet. It must show 100%.
1. Save the file and upload it back to the Rev360 portal. Click “Preview” to confirm the system-generated computation matches your records.
Step-by-Step Guide: Value Added Tax (VAT) Filing
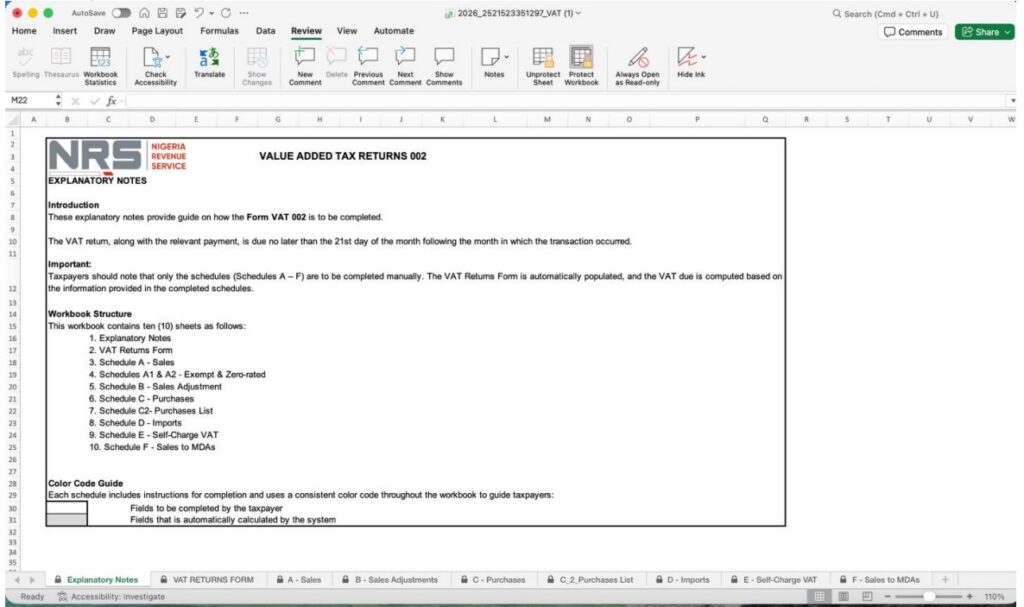
Note: The VAT Return Form sheet is auto-populated based on your Sales and Purchases sheets. Do NOT attempt to manually unhide or edit it, as this will corrupt the file for upload.
VAT filing is now “Schedule-based,” meaning your Excel data builds your return automatically.
Step 1: Download & Explanatory Notes
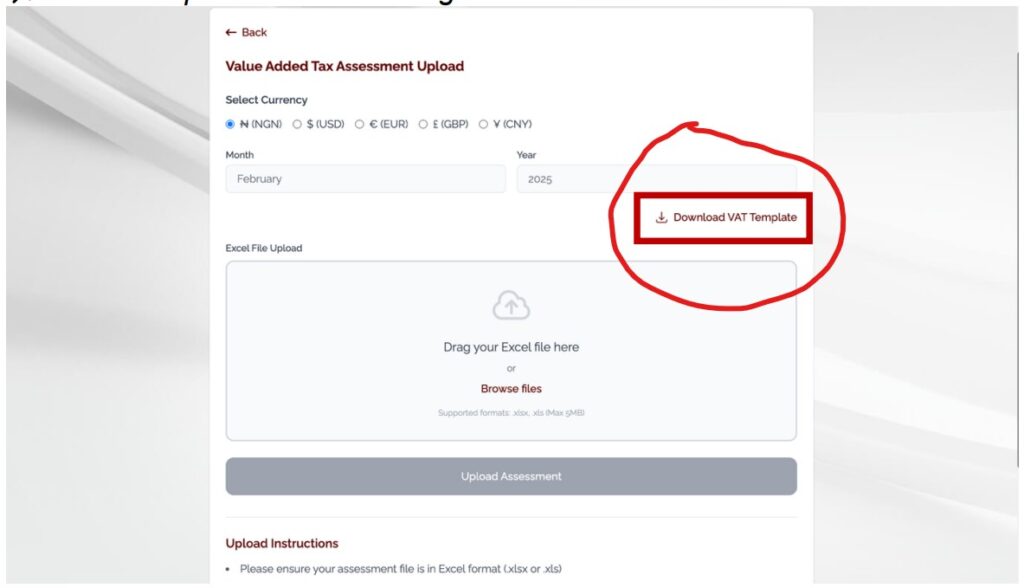
1. From the dashboard, select Self Tax Filing, select the “earliest VAT liability” under “Taxes Due”, and click “File Now.”
2. Download the VAT Template. Do not attempt to fill the “VAT Return Form” sheet manually.
Step 2: Filling the Sales Sheet
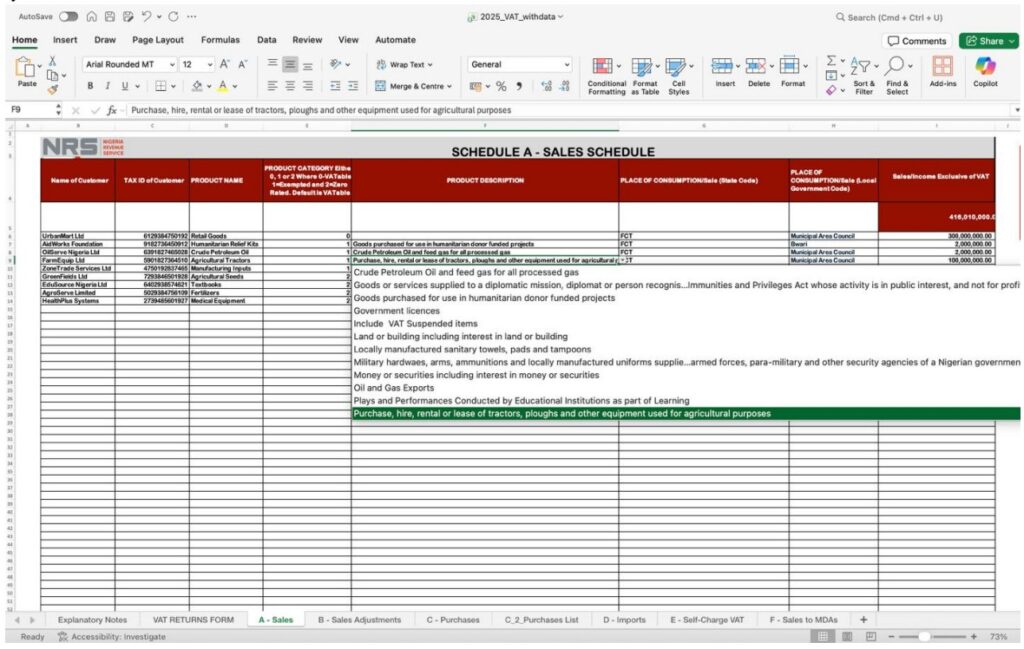
1. Enter every sale. In the “Product Category” column, you must use these codes:
- 0: Vatable Items
- 1: Exempt Items
- 2: Zero-Rated Items
2. Select the State and LGA for the “Place of Consumption.”
Step 3: Claiming Input VAT (Purchases List)
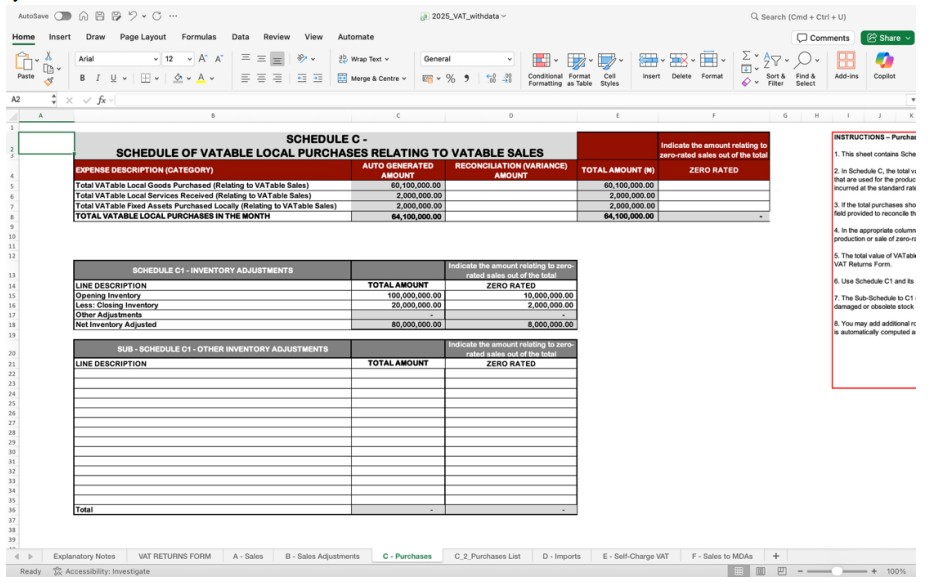
1. Navigate to the “Purchases List” sheet.
2. Enter the Seller’s Name, Seller’s Tax ID, and the Purchase Amount. The system will automatically calculate the allowable Input VAT.
Step 4: Sales Adjustments & MDAs
1. If you had returned goods, use the “Sales Adjustment” sheet.
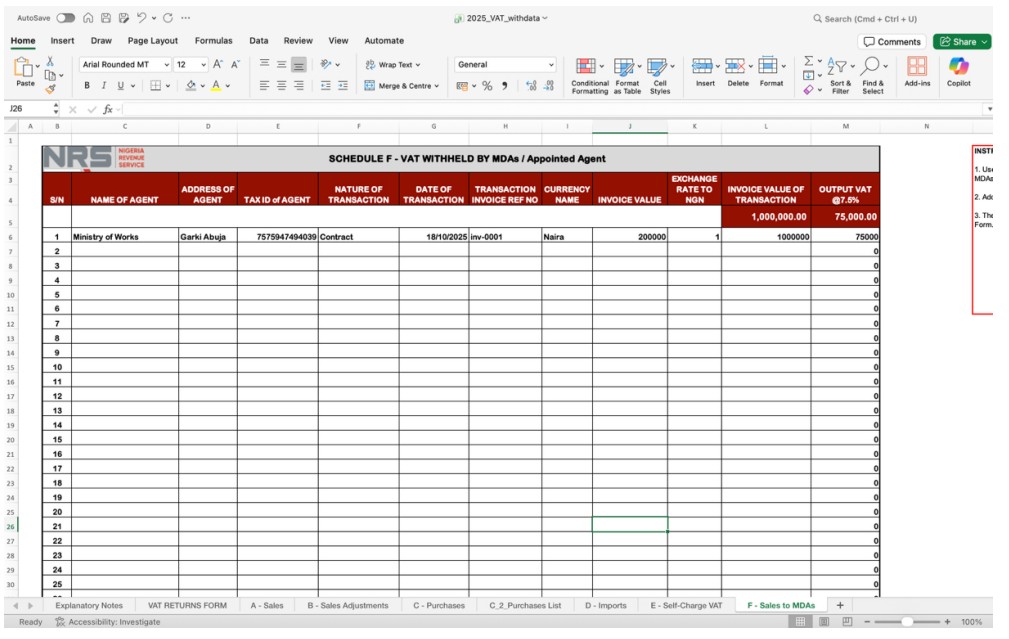
2. If a Government Agency (MDA) withheld your VAT, enter those details in the “MDA Sheet” to ensure you aren’t double-charged.
Withholding Tax (WHT) & Other Modules
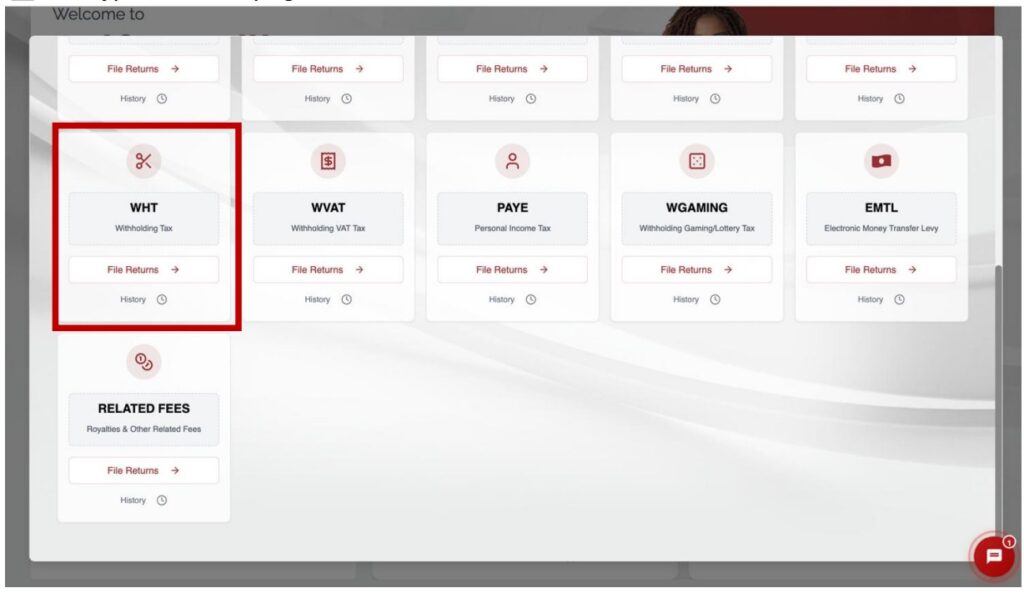
Withholding Tax (WHT):
1. You must provide the Tax ID of every beneficiary.
2. The Penalty: If you leave the Tax ID blank, Rev360 will automatically apply a 20% WHT rate instead of the standard rate.
Payment & Receipting:
1. Once filed, click “Make Payment.” The system generates a reference (RRR).
2. After payment at a bank or online, the system performs “Automatic Posting,” which updates your tax position immediately and generates a digital receipt.
Final Compliance: The PDF Upload
Once you have successfully uploaded your Excel template and previewed your tax computation, the Rev360 portal moves to the Document Upload phase. This is a mandatory compliance step.
The Consolidated PDF Requirement
You must upload your Audited Financial Statements as a single, legible PDF file. According to the NRS manual, a partial upload will result in the rejection of your filing. Your PDF must include:
- The Auditor’s Report
- Statement of Financial Position (Balance Sheet)
- Statement of Profit or Loss (Income Statement)
- Statement of Cash Flows
- Statement of Changes in Equity
- Notes to the Accounts (Very Important)
- Capital Allowance Computation
Warning on Data Consistency
The Rev360 system is designed to cross-check the numbers in your Excel template against the figures in your uploaded PDF.
1. The Desk Review Flag: If there is any discrepancy between the two, the system will automatically flag your account for a Desk Review by the NRS.
2. Final Action: Only after the document is uploaded should you tick the Declaration Checkbox and click “Submit Return.”
Expert Tips for a Successful Rev360 Transition
1. Do Not Edit Formulas: Never change the hidden formulas in the Excel templates.
2. Check Your Email: The NRS sends all critical migration tokens via email.
3. Stay Verified: Ensure your CAC status is “Active” before attempting to register.
Official Resources
To stay updated on the latest news and to view the official release of the manual, visit the Nigeria Revenue Service (NRS) website: [NRS Official News Release: Rev360 Launch and Portal Guide]
Frequently Asked Questions (FAQs)
No. Existing taxpayers on TaxProMax will have their records migrated to Rev360, login details to be use on Rev360 will be sent to their existing email addresses, and their passwords can be changed
No. New credentials will be sent to your existing email address, which can eventually be changed to your preferred login details or credentials.
No, you will not need to start from scratch. Your existing data will be migrated, and you can follow our guide on NRSPortal.ng on how to access your profile on Rev360.
Yes. Taxpayer profiles, filings, payments, WHT credit notes, balances, and compliance history will be migrated to Rev360.
To improve efficiency, transparency, and user experience. Rev360 builds on existing platforms like TaxPro Max to deliver a more advanced and seamless tax system.
Yes. Rev360 is designed to replace TaxProMax as the unified NRS digital tax platform. However, TaxProMax may run concurrently for a transition period to allow smooth migration of data and users.
Rev360 offers faster processing, improved transparency, and easier navigation. It reduces manual steps and provides clearer visibility into your tax activities.
Yes. Rev360 applies to all eligible taxpayers including: companies, business names, and non-resident entities within the scope of Federal taxes
Taxpayers are required to update their CAC records where necessary. Data can be automatically retrieved from CAC database
Yes. New business registration on Rev360 is fully digital and does not require physical visits except in exceptional cases.
Your Tax ID is automatically generated when a new entity is incorporated with the CAC. If you do not have it, you can retrieve it online via: https://taxid.nrs.gov.ng. Select Corporate, choose your organisation type, enter your BN/RC/IT number and click Retrieve Tax ID.
Your Tax ID is automatically generated when you register with the National Identity Management Commission (NIMC). Retrieve it via the same portal by selecting Individual and providing your NIN or NINAuth Share Code. Others (Non-residents, MDAs, etc.): Select Others, choose your entity type, follow the on-screen prompts and click Retrieve Tax ID.
A Tax Representative is a person authorised by the taxpayer, either an employee or tax consultant, to manage tax matters on the platform.
Tax Consultants obtain Tax IDs through NRS accreditation and registration as recognised tax practitioners on Rev360.
For corporate – Registered Company (RC) Number, Business Name (BN) Number, Incorporated Trustees (IT) Number, etc.
You must provide utility bill in addition to CAC Form 3, as it relates to Tax Office transfer request.
Yes. Rev360 supports self-filing of tax returns and payments for VAT, WHT, CIT, and other applicable Federal taxes.
Yes. Taxpayers can view WHT credits, including VAT deducted at source, and reconcile them through the tax ledger
Yes. Rev360 supports self-filing of tax returns and payments for VAT, WHT, CIT, and other applicable Federal taxes.
Rev360-generated credit notes serve as official evidence; however, statutory withholding requirements remain applicable.
Yes. The platform supports objections, dispute resolution, and the electronic submission of supporting documents.
Yes. All official notices, including audits, desk reviews, and assessments, will be issued through the Rev360 portal.
Yes. Tax Clearance Certificates (TCCs), refund requests, and tax statements can be initiated and tracked online.
Business address and tax office changes can be updated on the portal, subject to NRS approval.
Most processes are fully digital. Physical visits may only be required for exceptional compliance or verification cases.
Yes. Non-resident companies and foreign vendors can register and obtain Nigerian Tax IDs on Rev360.
Yes. Rev360 applies modern cybersecurity, encryption, and data protection controls in line with the Nigerian Data Protection Act (NDPA).
Rev360 is designed to be straightforward, with guided onboarding and step-by-step prompts to help first-time users complete tasks on the platform.
Need Professional Assistance with Your Filing?
Don’t risk the ₦50,000 daily penalty. Our team of certified accountants can help you prepare your Audited Financial Statements and file your 2026 Company Income Tax (CIT) accurately on the Rev360 portal.
[ Chat with a Compliance Officer on WhatsApp] or [Request a Professional Consultation]